Kim Padan: Pro-Life Speaker

Showing posts with label Design Team. Show all posts

Wednesday, April 10, 2019

Sketchy Wednesday!


Recently, I was asked to join the Sketch Challenge Team on Splitcoaststampers, and I am thrilled!  I get the sketches in advance, and post late Tuesday nights.  Deadlines are good for me!  I'll be on the DT April through September.


Today's Sketch #744 came from Cathy (cathymac) and it has lots of layers.  I love layers!  Great way to use designer paper, which I have in seemingly endless supply.  I pulled out SU's "Painted Blooms" dsp which has lots of wonderful colors.  My stamps are from Unity Stamp Company, "...So very Grateful."  My first attempt was watercolor, but the wc paper was too yellow for this designer paper.  At least I have a colored image to use later!  Instead, I stamped with Stazon jet black on whisper white, then colored with markers.  Couldn't find my blushing bride marker, so I used regal rose, along with rich razzleberry, blackberry bliss, daffodil delight, wild wasabi, and marina mist.  The sentiment is punched out and popped up, then adorned with a tiny enamel heart. 


Last week's Sketch was from Diane (DCinkit).  It's very different, with the multiple strips.  First, I started with a card base of sahara sand and SS pattern paper.  I then opted to create a scene, cutting it up.  I used SU's "Wetlands" and my aqua brush for the beach scene in sahara sand, bordering blue, and regal rose. The sentiment is from "Teeny Tiny Wishes," stamped in island indigo. I chose to keep it just on the word window punched piece so the original sketch is not obstructed.  Lots of baker's twine finishes it off. 


It's going to be lots of fun creating these sketch cards over the next 6 months.  Be sure to join in; there are no deadlines to upload on SCS!

Inky {{{HUGS}}}
Kim

Monday, February 25, 2019

First Blog Challenge Card of 2019

Hi Stamping Friends!

Like many in the blogosphere, I let my blog go into hibernation.  I looked at y list of posts, and there are 5 in the drafts.  I had a bit of a rough 2018, so many projects suffered a bit.

But I was stamping a fair amount, just not posting here.  In fact, last fall I was asked to join the Dirty Dozen on Splitcoaststampers!!  My term began in November and completes in April.  Because the Dirty Dozen projects are only available to Fan Club members, I can not post them here until months after my term.  By then, I might forget about it!  LOL

I also kept busy with Virtual Stamp Night duties; in fact we are prepping for the spring event now.

But last Friday, while looking at the MIXability challenge on SCS (be inspired by tin tile ceilings), I decided to search for an interesting color combo.  I have The Color Throwdown bookmarked, and saw a very tough palette staring me in the face! Of all the weeks to decide to look for a challenge not on SCS!  I needed a masculine birthday card, so I gave it a go.  This took forever!  Ha! 

My card base is basic gray.  I covered a card front-sized piece with aluminum foil, and ran it through my Big Shot with the chevron embossing folder.  I coated some portions with versamark, and heat embossed with copper powder.  I also added some gold pigment ink and embossed with clear powder.  Grabbing a Spectrum Noir alcohol ink purple marker (hey, it is a MIXED media challenge!)  I started coloring a portion of the card front, and thought Yuck.  That's when I decided to cut 4 tiles out of the card front so the purple would be random.  The chevrons were set up in alternating directions.  There wasn't enough purple, so I added the center circle.  All of the purple was coated with the gold pigment ink (which doesn't show) and heated with clear embossing powder.  As you can see, I also have a strip of cajun craze which is partially coated in copper embossing.  The sentiment is from SU's "Epic Celebration."


It was hard to photograph, so I took 2 angles.  I think this took me 2 hours to finish, compared to 15 minutes for the Free4All challenge to use our birthstone color!  I definitely need to get more comfortable with mixed media projects!  But at least, it inspired me to wake up my blog!  Hope to see you again soon!

Inky {{{HUGS}}}
Kim

Thursday, March 19, 2015

Congratulations to the Mashup Winners!

Hello Everyone!


We had a great time celebrating our 200th challenge at The Friday Mashup!  After the two weeks, each of us on the Design Team chose favorites (it was SO hard to choose!) and several people also won fun prizes!

To check out who won, read this post from our fearless leader, Holly!

And come back tomorrow morning for another fun challenge!

Inky {{{HUGS}}}
Kim
Friday, March 6, 2015

Celebrating #200 with Prizes at the Friday Mashup!!

Hello Stamping Friends!!

Happy Friday!!  I really mean...HAPPY FRIDAY MASHUP!!  Today, this fabulous challenge blog is celebrating its 200th challenge (which is kinda like 400th when you think about it!  LOL)   PLUS, I am excited to share with you that I am a Guest Designer for the month of March!!  How cool is that?

As a way to celebrate and to thank all of the Friday Mashup fans out there, we are having a Blog Hop with all sorts of PRIZES!  Participants in FM200 will be eligible for prizes from these fabulous companies... Newton's Nook,  Lawn Fawn, Ellen Hutson, MarkerPop, Your Next Stamp, Avery Elle, and Sugar Pea Designs!  We have two very Special Guests joining in the fun...Sandy Allnock & Jennifer Jackson from Newton's Nook have both created Mashup's for us! The prizes will be chosen randomly from people who upload a card to the Friday Mashup InLinkz and make comments on the Design Team cards.

So...what is the challenge this week?  We are inviting you to choose 2 previous challenges, and then Mash them Up!  That means you will either have 2 challenge components...or FOUR!!  How fun is that?  (You can find a complete list of challenges HERE on the FM blog, or HERE on Pinterest.)

I decided to choose a challenge from the first 100, and one from the second 200.  I admit that I changed my mind no fewer than four times!  I have combined both parts of both challenges:  FM72 has a sketch, and asked us to use flowers, and FM153 gave us the colors daffodil delight, wild wasabi, and perfect plum, plus water coloring.  Fabulous!!


 The sketch could be interpreted as having one big layer on the base under the other elements, or the main elements placed directly on the base.  So I decided to compromise by doing a tone-on-tone look, adding just a bit of daffodil that is embossed with the petals-a-plenty folder.  I taped wild wasabi striped ribbon directly on the card...no knot, no bow!  I chose to use "Fabulous Flowers" from SU...one of my very first stamp sets.  I stamped in Stazon jet black on water color paper, then used my aqua brush to add the challenge colors, then layered it on perfect plum.  I love this spring color palette! I flipped my sketch to be vertical instead of horizontal.   My flower is made, using an older flower punch that has been embossed with the elegant swirls folder.  The leaves are from the bird punch, and the flower center is a smaller circle punch.  I still love my punches!  My sentiment is from "On Your Birthday," and seemed appropriate for the 200th challenge!

Funny note of nostalgia here...I haven't used a black back drop for my cards in quite a while, but I often did when I was on the DT before.  Somehow, it felt right.  heehee

Be sure to participate in the challenge...it is even being extended an extra week! Check out The Friday Mashup blog for all the entry details!

Can't wait to see what you create!

Inky {{{HUGS}}}
Kim

Tuesday, February 24, 2015

Spring Colors for a Cold Winter Day

Hello, and Happy Tuesday!

Today is the last Tuesday of the month, which means it is my last week as a Guest Design Team member over at SCS.   BooHoo!  I have had so much fun!  I will continue to play along with these  challenges because they always get my creative juices flowing!

This week, the other Kim has asked us to use Blackberry Bliss, Pear Pizzazz, and Pool Party...completely my kind of color combo!  I know I will use this again!


I rarely use basic black for a card base, but it made sense with this silhouette image from SU's "Just Believe."   I embossed a layer of black with the fancy fan folder, then wrapped some pear pleated satin ribbon around it...it really pops off the black!  I stamped the flowers in black, then sponged pear and pool party in the background.  The image is mounted on Moonlight dsp, and popped up with dimensionals.  I stamped the sentiment on pool party, so that it would look nice against the sky.  The modern label and scallop oval punches make their appearance together again.

I have no idea where this card will end up.  I think I may have a hard time parting with it!

Thanks for stopping by!

Inky {{{HUGS}}}
Kim


Tuesday, February 10, 2015

Time for Another Color Challenge

Hello, and Happy Tuesday!

Today I am posting my card for the Splitcoaststampers Color Challenge.  I am having fun as a Guest DT member, and I hope you can participate in this week's challenge!

The blue-green palette (bermuda bay, old olive, and coastal cabana) can go along with a cool wintery look, or something for spring.  I went for the spring look, because I am seriously ready for sunshine, warm breezes, and fresh flowers!  This week's dessert is to use at least 4 layers.  I forgot about dessert, but did it anyway.  I love layers!


My card base is old olive.  The next layer is whisper white, on which I stamped some grass from "Inspired by Nature."  I also dry embossed the top portion with the cloudy day folder, then sponged coastal cabana over the clouds.  I added a strip of textured bermuda bay, and wrapped some coastal cabana ribbon around these layers.  The image panel features "Field Flowers," a great 2-step set.  I realize these colors are unlikely to be seen on one flower, but I like this any way!  I wasn't sure where to place the sentiment.  Once I decided to place it on the bottom half, I stamped more of the grass,  I lightly sponged the image and sentiment layers.  I also added a silver brad and some bits of ribbon.  Of course, there are some dimensionals too...I rarely make flat cards!

Be sure to check out the color challenge...I'll be looking at the gallery to see what you create!

Inky {{{HUGS}}}
Kim

Tuesday, February 3, 2015

Exciting and Colorful News!

Hello, and Happy Tuesday!!

Anyone who follows my blog knows that I LOVE color challenges.  Well, imagine my excitement when I received a private message on SCS asking me to be a Guest for the Color Challenge Design Team!!  WooHoo!  I squealed so loudly, my husband asked what was going on!  He is happy for me, even though he doesn't know a garden green from a wild wasabi!  LOL


So, this week's colors are melon mambo, pink pirouette and whisper white.  The dessert is to use vellum. This was tricky for me on two counts.  First, I often use pink with other colors, but rarely feature so much pink on one card.  Then there was the vellum.  I wasn't even sure if I had any, but then remembered a small stack of 4x6 pieces in different colors and patterns.  I decided on this white piece with swirls.  I like it over the pink pirouette, and I think it goes well with this stylized flower from "Friends Never Fade."  Yes, I use this image a lot...but I LOVE it! In addition to the 2 shades of pink, I also used my smoky slate marker, then cut it all out with the scallop circle punch.  I used "Teeny Tiny Wishes" again with the word window punch.  My accessories are the melon mambo organza ribbon, and some silver beads from a big box store.  They are part of my stash that I am continuing to whittle away.

I hope you can join the challenge this week.  I'll be visiting galleries to see what everyone creates.  Thanks for checking out my blog again today!


Inky {{{HUGS}}}
Kim

Friday, May 25, 2012

Friday Mashup!! Sketchy for Dad

Hello Dear Stamping Friends! It's Friday, and that means it is time for another Friday Mashup challenge!  http://www.fridaymashup.com/  Today is my final project as a Design Team member...BooHoo!  This was my first ever DT gig, and I had a BLAST!  I am so grateful to Holly for giving me a chance to participate.  It has been a great year with so many fantastic challenges!  I have learned a lot, and have *met* so many fabulous stampers!  This week's challenge was a little tricky, just 'cuz I was packing for vacation, and my mojo was stalled out.  Yep...as this post goes live, I will be in Virginia and DC...WooHoo!  So here is the "Mashup" Challenge :


  • Make a project for " That special Man in your life ".
  • Or Make a project with the " Sketch ".
  • Or "Mash it Up" and create a " Masculine card using the above Sketch ".

Well, when I first made this card, I felt like it needed something more.  But after wandering around the forests and hills of Virginia this week, I think it is just fine!  My husband loves enjoying nature, and so I think he will enjoy this card.  I began with a search for designer paper...intending to use Woodland Walk (I think that's the name) but couldn't find it.  No worries...Lisa used it on her amazing card!  Having little time to spare before I finished packing, I came across an older retired fall package of DSP.  No clue what the name is, but that is where I got the color palette.  My card base is soft suede.  The lower squares (including the more mustard layer) are dsp.  For the top square, I stamped the leaves from Lovely as a Tree in always artichoke on whisper white.  Using my blender pen, I colored with retired mellow moss ink.  Then I embossed it with the square lattice impressions folder in my Big Shot, and sponged with both soft suede and always artichoke, then popped up with dimensionals.  I added the sentiment from (Trusty) Teeny Tiny Wishes with the usual word window and modern label punches.  A big designer button and baker's twine finish it off.
I hope you join us this week for this great challenge!  Masculine cards can be tricky, but we all need them sometime!  Be sure to use keyword FM60 in your online gallery.  See the other DT cards on the Friday Mashup blog!  http://www.fridaymashup.com/

While I am signing off as a DT member, I most certainly will visit the Friday Mashup again!  How could I not?  Long-time DT members, plus the new faces...These girls are FABULOUS!!  See you around the paper-crafting-blogosphere!!

Inky {{{HUGS}}}


Friday, April 20, 2012

Friday Mashup! Pale as a Ghost!

Hello Stamping Friends!! Happy Friday! I am just one week away from a BIG fund raiser, and my mom is visiting, so I had to squeeze in some stamping time! Why? It's time for another Friday Mashup challenge! http://www.fridaymashup.com/ This week, Rita is our hostess...and she came up with a fun challenge (though I struggled bit!)

  1. Make a project using the "Sketch"
  2. Or Make a project using the "Ghosting (or Versamark Resist) Technique"
  3. Or Mash it Up! And make a project using the sketch and the ghosting technique

Well, I decided to mash it up...but you can hardly tell! Not only did I get impatient and not allow my versamark to dry thoroughly, I used very pale colors! Oops! It's much prettier in person! My card base is blushing bride. I stamped the flowers and grass (really I did!) from Inspired by Nature on very vanilla card stock. I sponged baja breeze, blushing bride, and pear pizazz ink on it, then layered it over concord crush for contrast. Next, I used my Sizzix 2 tags die with the big shot to cut out the smaller image panel. I stamped versamark again...but cheated this time. I used clear embossing powder to heat emboss this time...and you can still barely see it! I need to practice this technique again...it really isn't hard...just be patient! LOL! The sentiment is from "Blessings from Heaven" stamped in concord crush. I added a bit of blushing bride dsp detailed with the scallop trim punch. I also added pear pizazz ribbon, popped it up with dimensionals, and added a butterfly from the Beautiful Wings sizzlit for the final touch.
Late night...lousy picture...but a FABULOUS challenge! Be sure to check out the amazing DT cards over at the Friday Mashup blog...then join us! http://www.fridaymashup.com/

Inky {{{HUGS}}}

Friday, April 13, 2012

Friday Mashup!! Scurrying is a "Learned Art"

Hello and Happy Friday, everyone!! Time for another Friday Mashup! http://www.fridaymashup.com/ We have a fun challenge this week from Holly...
  1. Make a project using your "Favorite Muppet color combo"
  2. Or make a project "for kids"
  3. Or make a project "For kids...using your favorite Muppet color combo"

WooHoo!! I love the Muppets! Very silly, but oh so adorable! The toughest part was deciding which Muppet to use as my inspiration. Of course, there's Kermit...and I love Animal and Gonzo! But I decided to pick the sassy and always hungry "Rizzo the Rat." He's the only rat I enjoy watching!! ( http://www.youtube.com/watch?v=enrMChZPOc8 )

Everything here is frm Stampin' Up. My card features the colors riding hood red, chocolate chip, river rock, basic black and (retired) crushed curry. Hey...gotta use up my stash! I embossed the chocolate chip with the houndstooth folder in my Big Shot. The small and mid-sized circles were punched out; the large circle was made with the Sizzix circles die. I embossed most of the circles with perfect polka dots. The little fox (in lieu of a rat!) is from Fox and Friends. The sentiment is from On Your Birthday. I used my chocolate chip marker for the dots on the large circle to keep it flatter. The striped ribbon is long-retired...again, trying to use up stuff. I like the way the stripes contrast with the circles. Hope you do too!

Be sure to check out this week's challenge http://www.fridaymashup.com/ ...and play along! Use keyword FM54 in your gallery...and tell us who your favorite Muppet is!

Inky {{{HUGS}}}

Friday, April 6, 2012

Friday Mashup! Tic-Tac-Toe!

Hello Stamping Friends. Today is Good Friday for millions of Christians around the world. I try to have a quiet, solemn day...so I was happy to be able to create my card ahead of time. Kasey has a fun, unique challenge for us at the Friday Mashup http://www.fridaymashup.com/ this week! We're playing Tic-Tac-Toe!

  1. Make a project using a "Special Fold"
  2. Or make a project using the "Tic Tac Toe" board
  3. Or Mash it Up! and make a project with a special fold, using the Tic-Tac-Toe board


I decided that I needed to play with my new "Baby Prints" stamp set from the Occasions Mini catalog. Lookin at the tic-tac-toe board, I opted to also include ribbon and bright colors...but I COMPLETELY forgot about the special fold! Oops. But I still love the look, and will likely make more for the ministry!

My card base is melon mambo, with layers of daffodil delight, whisper white, and rich razzleberry dsp. The square whisper white layer is embossed with Petals-a-Plenty folder in my Big Shot. These cute hand and foot prints are pretty good size, so I just played around with the placement. The sentiments are from the same stamp set, punched out with an oval and popped up with dimensionals. Just 2 colors of ink on this card: melon mambo and daffodil delight. My final detail is a bow made with retired ribbon...the spool is *almost* gone!

Check out the fun challenge this week...lots of great inspiration from my fellow design team gals! http://www.fridaymashup.com/ Be sure to use keyword FM53 in your online gallery.

Have a great Easter weekend! Inky {{{HUGS}}}

Friday, March 30, 2012

Friday Mashup!! Fan Favorite with Kites!

Happy Stampy Friday!! We have a great challenge for you this week...it's our Fan Favorite!!! http://www.fridaymashup.com/2012/03/fm52-its-fan-favorite.html We're playing with kites, thanks to a challenge presented by Laureen...which is a lot of fun! I made this card in advance...then realized that I won't be flying a kite today, but I will flying on a plane! I am headed back from LA to my little home in Danville Illinois! I am probably exhausted after a full week of conference workshops. So, I'll look at your creations after I get some sleep!
  1. Make a project using colorful twine
  2. Or make a kite themed project
  3. Or make a kite themed projet using colorful twine
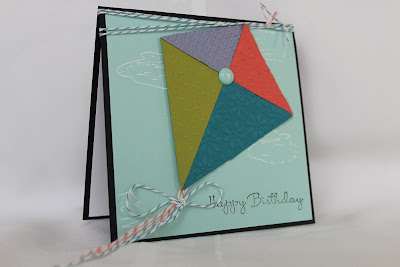
I don't have any kite stamps...but I want some! In lieu of stamps, I made my own kite. My card has very little stamping...just a sentiment from a new birthday set. My card base is black, and I added a little of each of this years in-colors. Pool Party for the sky background, with clouds drawn by a white gel pen. Then I made portions of the kite in wisteria wonder, lucky limeade, calypso coral, and indigo island. Each piece was embossed with a different folder, and a polka dot brad holds it together. I added baker's twine for the tail, and some on the card fold as well.
Check out this week's challenge, and play along! Link up your project on the Friday Mashup blog, http://www.fridaymashup.com/2012/03/fm52-its-fan-favorite.html and use keyword FM52 in your gallery.
Inky {{{HUGS}}}

Friday, March 23, 2012

Friday Mashup!! #51

Hello and Happy Friday!! Great seeing you here again! Are you ready for another Friday Mashup challenge? Lisa is our hostess this week...check it out:
  1. Make a projected using the "Quilted card technique"
  2. Or make a project using "Something that's been forgotten" (in your stash forever!)
  3. Or Mash it Up and make a "Quilted card project using something that has been forgotten"

Well, let's face it...we all have something in our stash that has been untouched and perhaps even forgotten, right? For many of us, that includes stacks of pattern paper, which is PERFECT for the quilted card technique!

My eye caught a package of Bella Rose dsp. Love this stuff, and I will be sad when it is gone! I cut strips from 2 sheets, and used both sides of each to make a pattern, taping the strips down on a scrap piece of card stock. I then cut it out with my Top Note die in the Big Shot, then took my chocolate chip marker to make faux stitching. Note the stitching is uneven..that's what any real stitching would look like if I ever tried to sew! LOL! I placed my "quilt" on a riding hood red card base that has a layer of pink pirouette embossed with perfect polka dots. I also included a strip of the rose pattern of the dsp between the pink and the quilt. My image is from Simple Sketches...one of my first and favorite stamp sets! I don't know when I last used it. It is a 2 (actually 3) step stamp, which loksgreat when you use markers. The lined image was stamped in chocolate chip. The next stamp has pink pirouette and lucky limeade. The final stamp has riding hood red and pear pizazz. Love the dimension! I punched it out with a scallop circle, and layered on the larger scallop circle, highlighting with a white gel pen. The sentiment is from Teeny Tiny Wishes, on a word window punch. Finally, I added this fun, retired polka dot ribbon. Last I checked, you can get some of this on the Stampin' Up Clearance Rack!

I hope you join us this week! Dig deep in your stash...have some fun! Check out the other DT projects for some inspiration.http://www.fridaymashup.com/ Be sure to use keyword FM51 in your online gallery. Can't wait to see what you create!
Inky {{{HUGS}}}

Friday, March 16, 2012

Friday Mashup #50!! Blog Candy!!

Hello, and Happy Friday!! It's a great day, because we celebrating Challenge #50 at the Friday Mashup!! And a celebration isn't complete without some treats! So this week, we have Blog Candy on each Design Team members' blogs! More on that at the end of my post.
But first, Heidi is hosting this week's challenge, and it's a beauty!! We have a great sketch and a fun technique!
  1. Make a project using the "Sketch"
  2. Or Make a project using the "Faux Mother of Pearl Technique"
  3. Or Mash it Up! and Make a project using the "Sketch" and "Faux Mother of Pearl Technique"

    This is such a lovely technique that I had NEVER used before! (This DT gig has really expanded my horizons! LOL) If it is new to you, check out this tutorial on Splitcoaststampers.
My card is filled with fresh colors for spring! All products used are from Stampin' Up! After flipping the sketch, I started with a wonder wisteria card base, layered with lucky limeade and 2 sides of the same sheet of Cheerful Treat dsp (a hostess item in the Idea Book & Catalog.) I added some retired polka dot melon mambo ribbon, but you can get new ribbon with scallops! Next, I used shimmer paint on whisper white, and sponged with pink pirouette ink for the mother of pearl technique. I stamped this image from Bordering on Romance (from the Occasions Mini) with stazon black ink. Next I used my blender pens and re-inkers to color the image. After it dried, I punched it out with the extra large scallop circle punch, layered it with concord crush and popped it up with dimensionals. (Edited: The concord crush circle was made with the Sizzix Circle di found in the Stampin' Up catty) The sentiment is from Teeny Tiny Wishes, stamped with concord crush ink on more of the sponged/mother of pearl paper.

Now...about the BLOG CANDY!! For my collection, I have 2 rolls of non-SU ribbon, an unused non-SU stamp set (cute, but I just never touched it!), a scallop circle chipboard "scrapbook", and lots of rub-ons, including Christmas and Valentine's Day sets. So, how do you win? First, submit your submission to the Friday Mashup Challenge #50. (Deadline is Thursday 3/22 at 12:00 a.m. EST) Next, go to each Design Team member blog, and comment on each of their entries. Every DT member has blog candy, so there are lots of chances to win!! (Just one blog candy bundle per person, shipping just to USA and Canada). We are excited to see what creative projects you create!!

Inky {{{HUGS}}}

Friday, March 9, 2012

Friday Mashup! A Tisket, A Tasket

Hello Stampin' Friends! It's Friday, and that means it's time for another Friday Mashup challenge, and we are thrilled to have you join us! I'm the hostess this week, and, as you may know, I like to challenge myself right along with you! I rarely make 3-D projects, so I decided to give it a try. And with spring hovering right around the corner here in the Midwest, I decided some fresh spring colors would be perfect! I thought of "A tisket, a tasket, a green and yellow basket..." NO idea what the rest of that rhyme is! LOL Any way, here is your challenge:


  1. Make a project using the "Colors Green & Yellow" (any shade!)

  2. Or make a 3-D project that is a "Treat Bag or Treat Pouch"

  3. Or Mash it Up! and make a "3-D Treat Bag/Pouch using the Colors Green & Yellow"
My fellow DT members really stepped up their creativity with this one...and it encouraged me to stretch even more! How fun is that?!

I honestly had several ideas in my head. One was quite grandiose for my little hands, and so I failed miserably. I wanted to weave a basket together with strips of card stock. What a mess! Now, what will I do with so many 1" strips?? LOL! I'll never work for Longaberger! Then I remembered this Diaper-fold Pouch, which I found on splitcoaststampers years ago. It isn't very difficult...but I always struggle to get the sides folded in evenly. That's why LOTS of embellishments are fun! I used So Saffron dsp from the Subtles Pattern paper Stack for the pouch. I also used some Certainly Celery from the same stack. My Big Shot came in handy, with the Leaves #2 die, and this fabulous Folded Flowers die. I wanted a third color, so I added Calypso Coral to the mix. The flowers were sponged with so saffron and calypso coral, and the brad is from my previously-unused Sweet Stitches collection. Nearly gave these away! LOL! I also added some per pizzazz pleated ribbon. The sentiment is from On Your Birthday.

The chocolate is from Dove! YUM!

I hope you are up for the challenge...I can't wit to see what you create! Be sure to check out the Friday Mashup blog for some amazing inspiration! Use keyword FM49 in your online gallery.


Inky {{{HUGS}}}


Friday, February 24, 2012

Friday Mashup! 46 and Never Been Kissed!!

Never been kissed? Not really! I just wanted to get your attention! Today is Friday, which means it is time for another Friday Mashup challenge! It's not #46, it's actually #47. But I am 46 years old, and the challenge from our fearless blog leader, Holly, involves a new stamping technique for me...Kissing! LOL

1. Make a Project using the "Kissing Technique"


2. Or make a "Round" Project

3. Or Mash it Up! and make a "Round project using the Kissing technique."


Well ladies, I have been happily married for 18 years, so yes I have been kissed quite a bit! But in terms of stamping, I don't believe I have ever used the kissing technique! Good grief! It's so easy, where have I been?? If you haven't tried this technique, here's a quick tutorial from splitcoaststampers. Basically, you ink up a solid image stamp, such as this silhouette image from Stampin' Up's "Upsy Daisy," then, before stamping on paper, you take another stamp with a different color ink and press it on stamp #1. When it goes on the paper, you see 2 colors, and pattern on the soid image.


For my card, I used peach parfait card base, and added some Everyday Enchantment dsp from the Sale-a-Bration catalog. My project isn't round, but I did cut out this scallop circle in very vanilla with my Big Shot. I stamped the grass from Inspired by Nature in lucky limeade. I inked up the daisies with peach parfait, then used the small flower from Vintage Vogue to "kiss" it with poppy parade ink. I repeated the image several times to make a full field of flowers. Next I sponged the bottom with limeade and the top with baja breeze. I stamped a sentiment, also from Upsy Daisey, in poppy parade, punched with the scallop oval, nd sponged with baja breeze. I embellished with baja breeze seam binding and basic jewel pearls in the corners.


I hope you can join us this week. Just use keyword FM47 in your online gallery, and upload to the Friday Mashup blog. Remember, you need to limit the number of challenges to 5 in your project in order to be eligible for the Glamettes and Rock Star! Be sure to vote for the Fan Favorite challenge, too!! I can't wait to see what you create!


Inky {{{HUGS}}}

Friday, February 17, 2012

Friday Mashup! Vintage Collage

Hello everyone! Happy Friday! I am posting without details at the moment...I will edit later with more details. Another tough week! Check out this week's Friday Mashup challenge, hosted by Kasey! Editted: It is WEDNESDAY Feb 22, and I m finally adding details! I was busy with some wedding invitations for a former foster daughter. It's gonna be a while before I use wisteria wonder and concord crush again! LOL!! Anywho, on to the challenge:


1. Make a card using the Sketch


2. Make a card using a Vintage/Shabby Chic design


3. Or Mash it Up! And create a vintage project using the sketch.


I needed a sympathy card for a pastor whose father recently passed away. I wanted something understated for him. Well, I made this late Thursday night, and had it in the mail Friday. That might be a record for me! I started with an early espresso card base. I added crumb cake which was embossed with the square lattice impressions folder, then sponged with early espresso ink. My image panel is very vanilla card stock. I stamped images from Nature Walk in a random, collage pattern, using early espresso, always artichoke, and marina mist ink. There is a very faint image of the bird cage in the middle, but you can't see it. I inked the stamp withmarina mist, stampedoff on scrap paper, then on my vanilla. I think stamping off helps the vintage look. I also crinkled the imgepanel, then sponged with more espresso ink, then added some linen thread. Finally, I added photo corners made from always artichoke.


I hope you enjoyed this week's challenge! Inky {{{HUGS}}}

Friday, January 27, 2012

Friday Mashup! #43 - Never Be Afraiid to Try Something New!

Hello Stamping Friends! Happy Friday! I am so excited, because this week I am the hostess for the Friday Mashup challenge...WooHoo!! Creating new sketches isn't my strong suit, and when it happens, it's usually by accident! One thing I do like is using diagonal lines and contrasting them with round shapes.
I searched through my old cards (those pictures come in handy!) and found one using this sketch. I believe I had a piece that I had cut incorrectly, but decided to use it any way...Ta-Dah! Now, since the sketch is old, we have to contrast it with some NEW products in our stashes! I hope you got something new for Christmas...or maybe you recently spent money on new purchases. However you got it, let's see some new goodies! So here is your challenge:


  1. Make a project using the Sketch shown above

  2. Make a project using something NEW in your stash (paper, ribbon, stamps...anything!)

  3. Or Mash it Up and make a project using the Sketch and something NEW from your stash!

Now, I was thrilled to take this opportunity to use some of my new Sale-a-Bration items! As a Stampin' Up demo I was able to earn some with my orders in December! Nice perk, huh?! Anywho, this card features several things. I started with a poppy parade card base, because this NEW "Everyday Enchantment" dsp goes with it perfectly! The middle strip is pool party, layered with more of the enchanted dsp, then embossed with my perfect polka dots impressions folder in the big shot. I used my poppy parade and lucky limeade markers to color the NEW image from "Fresh Vintage," another SAB goodie, stamping it on very vanilla. The ovals were cut with the ovals die in the big shot, and the limeade one also has polka dots. Both ovals are lightly sponged with soft suede ink. As if that wasn't enough, the gorgeous organdy ribbon (in calypso coral and lucky limeade) AND the designer brad are also SAB items! WooHoo! Not everything is new...note the Teeny Tiny Wishes sentiment punched out with the word window. Yup. I'm still rooted in "tradition!" LOL


I hope you join me and the rest of the design team this week! Checkout the Friday Mashup blog, and be sure to use keyword FM43 in your online gallery!


Inky {{{HUGS}}}

Friday, January 20, 2012

Hello and Happy Friday! It's time for another Friday Mashup http://www.fridaymashup.com/ challenge!! Today Rita has a fun color challenge that is perfect for the upcoming holiday... Valentine's Day...combined with a great technique.
  1. Make a project using Paper Piercing
  2. Make a project using the colors Blushing Bride, Riding Hood Red, and Early Espresso
  3. Or Mash it Up...and make a project using Paper Piercing and the color combo

I made a card using the color combo, but COMPLETELY forgot the paper piercing! Good thing the Mash Up is optional...LOL!! Frankly, I am lousy at paper piercing, so maybe my subconscience was just dreading it too much! Any who...here is my card:

I started with a Blushing Bride card base...love this color!...with a strip of early espresso quilted ribbon wrapped around the front. The panel on the left is very vanilla, with punched out hearts embedded with the square lattice impressions folder in my beloved Big Shot. I used my regular heart punch, as well as the Heart to Heart punch to get the different sizes. I used the pattern paper stacks for the early espresso hearts as well as the scallop trim borders. The whole layer is popped up with dimensionals. The sentiment is from Delightful Dozen, stamped in riding hood red on very vanilla, and punched out with the decorative label punch, and layered over a touch of riding hood red. More dimensionals make this a plump cards. I like plump cards...they match me! LOL!
Be sure to check out the great creations from the rest of the design team over at the Friday Mashup blog http://www.fridaymashup.com/ . Use keyword FM42 in your online gallery. Can't wait to see what you create!!
Inky {{{HUGS}}}


Friday, January 13, 2012

Friday Mashup!! Thank You!!

Hello and Happy Friday! Time for another Friday Mashup challenge!! Lesley is hosting this week's challenge, and she has one that is perfect for my day job...thank you cards! I ALWAYS need thank you cards for donors and volunteers...so I appreciate the opportunity to make something special! Here is the challenge:


  1. Make a "Thank You" themed project

  2. Make a project using "Designer/Patterned Paper"

  3. Or Mash it Up and make a Thank You project using designer/patterned paper

I pulled out this very pretty DSP from Stampin' Up, called Timeless Portrait, using 2 patterns on opposites side of the same sheet. It coordinates with my river rock card stock base, and the layers of cherry cobbler and not quite navy under my sentiment. That sentiment is from God's Blessings...one of my favorite stamp sets! I used not quite navy ink to stamp it on very vanilla card stock. I also added a cherry cobbler heart, thanks to my punch, and added a small basic jewel pearl. The last detail is the cherry cobbler seam binding which is tied in a bow, not a knot! WooHoo!


The sketch is actually a variation of Freshly Made Sketches #1. I like going back to older challenges too!

Hope you can join us this wek at the Friday Mashup! Check out the Design Team projects for wonderful inspiration! Use FM41 as a keyword in your online gallery!

Inky {{{HUGS}}}