Kim Padan: Pro-Life Speaker

Friday, November 25, 2011

Friday Mashup! Sugar and Spice...


Hello Stamping Friends!! I hope you had a wonderful Thanksgiving!!
Now that Thanksgiving is behind us, I am officialy in "panic mode" for Christmas cards! This week's Friday Mashup gives me a chance to design something that will be fun and easy to duplicate. Lesley has a fun challenge for this week's challenge... http://www.fridaymashup.com/
  1. Make a project with a Christmas theme
  2. Make a project using aqua, chocolate, and white
  3. Or Mash it Up and make a project with a Christmas theme using aqua, chocolate and white
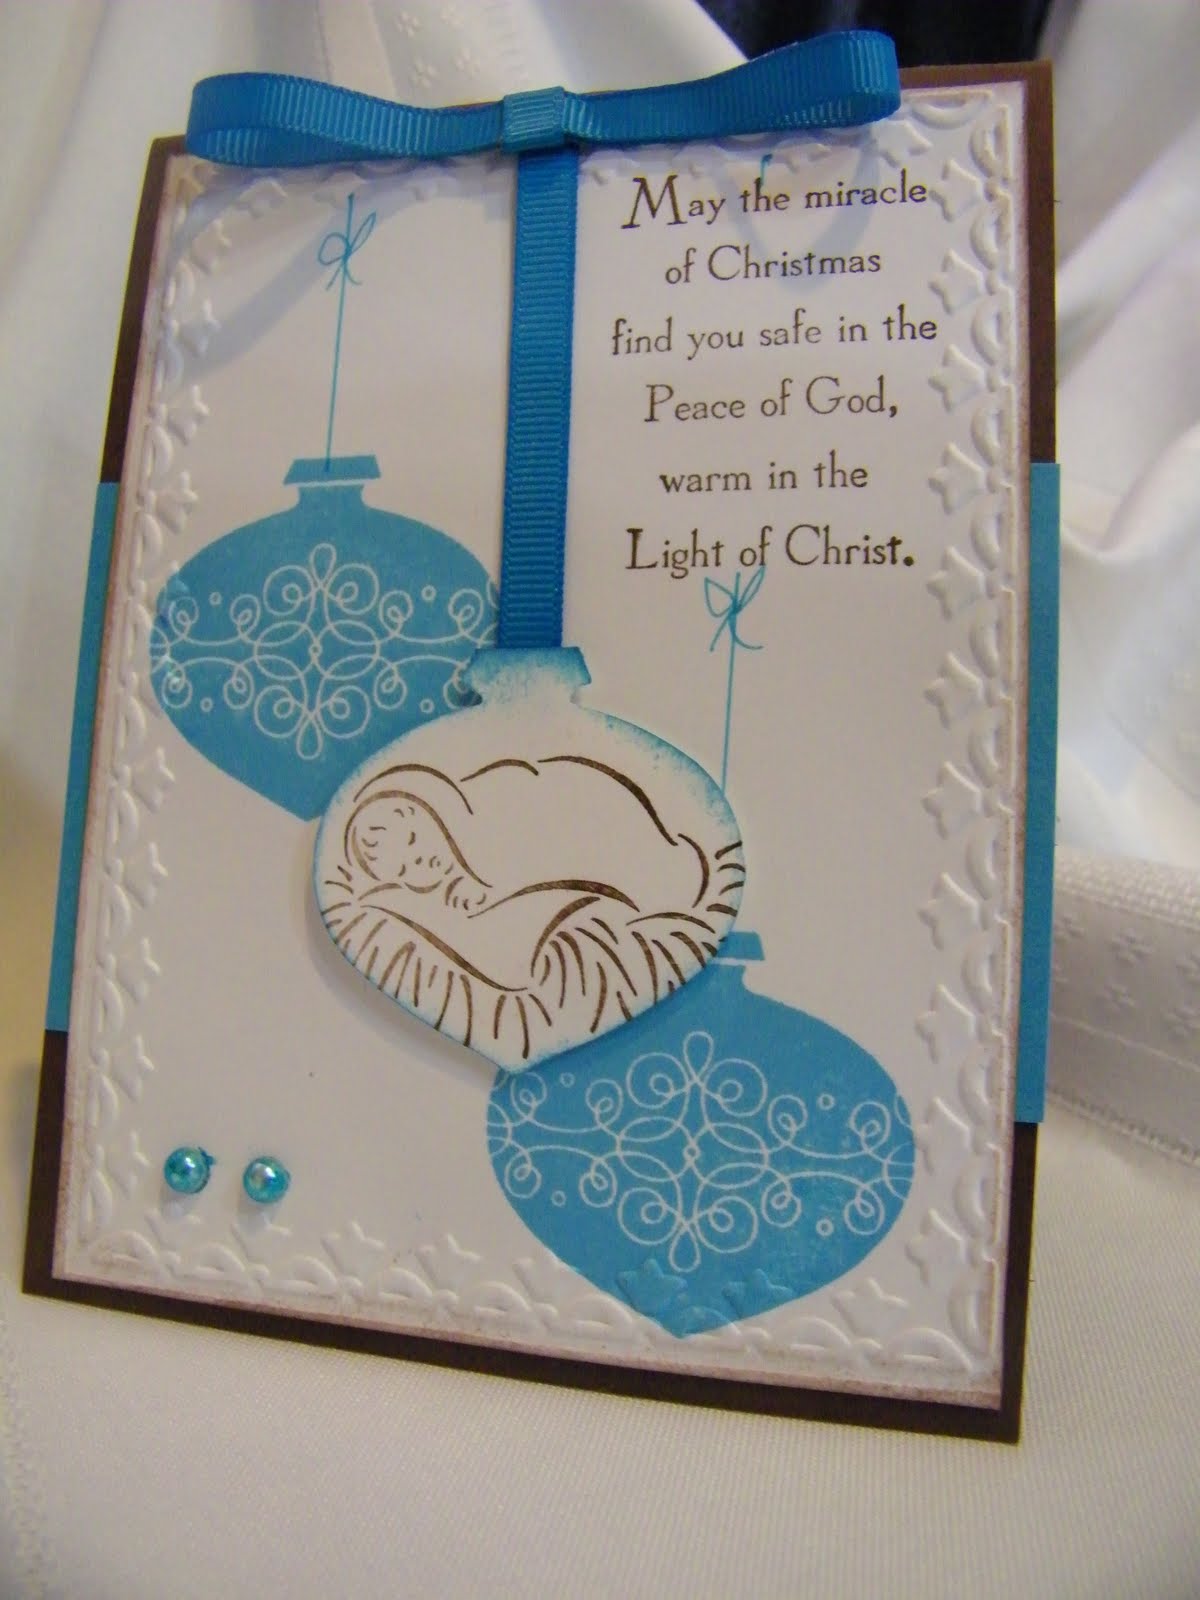
In terms of the colors, I chose Tempting Turquoise, Chocolate Chip, and Whisper White. I started with a chocolate chip card base, and added a strip of tempting turquoise. I added a whisper white panel, embossed with the tulip frame impressions folder in my Big Shot. I stamped the sentiment from God's Blessings, and the ornaments from Tags 'til Christmas. Next, I used my marker to add lines to those ornaments. Then I used my favorite Baby Jesus stamp from the retired Miracle of Christmas set, punched out with my ornament punch, sponged the edges, and popped up in the center. I sponged the edge of the white layer, and embellished with 1/4" grosgrain ribbon and basic jewel pearls colored with my marker.

I never would have considered this color scheme for Christmas...but it was a fun challenge! I should be able to do manyy more quickly after Thanksgiving vacation. I better...you should see my mailing list!!

Hope you join us this week at the Friday Mashup! Check out the blog http://www.fridaymashup.com/ for some yummy inspiration pieces...then link up your creations! Can't wait to see them!!

Inky {{{HUGS}}}

Friday, November 18, 2011

Friday Mashup!! Everything's Coming Up Rosettes!

Hello and Happy Friday, Everyone!! It's time for another fun and fabulous Friday Mashup http://www.fridaymashup.com/ challenge!! This week, Holly has a great sketch for us, plus a "technique"...
  1. Make a project using "Paper Rosettes"
  2. Make a project using the sketch above
  3. Or Mash it Up and make a project with paper rosettes using the sketch above!

Aye, aye, aye!! I really struggle with paper flowers (other plain punches! LOL!) I have the new Simply Score tool from Stampin' Up...but my fine motor skills stink!! So, while many of the uber talented design team members created some FABULOUS rosettes, accordion-style, I took a different approach. I TRIED the great accordion flowers...several times. Tried the spiral-cut-scallop-circle-flower-...Nada.

So, you get a PUNCHED "flower!" Hey, at least I got the sketch right! LOL!

The sketch is flipped, since I had this piece of card stock cut and ready to go. My card base is early espresso. I used some Paisley Petals dsp, plus made some of my own with the Paisley Petals stamp set (arrived in my home this week!) My hand made designer paper was stamped on whisper white card stock, using early espresso ink and colored with blender pens. I used river rock, soft suede, pear pizazz and not quite navy ink...then sponged with river rock and pear pizazz. I pulled out my neglected ticket corner punch for the stamped panel and layer of not quite navy. For the flower, I punched out an extra large baja breeze scallop circle, sponged with not quite navy ink. I layered it with a large designer button found in the Holiday Mini, and added a sentiment from On Your Birthday. I still have 2 birthdays to take care of this month!!

Hope you join us foer this week's challenge! Be sure to check out the inspiration pieces from the design team on the Friday Mashup blog! http://www.fridaymashup.com/

Inky {{{HUGS}}}

Friday, November 11, 2011

Friday Mashup!! Let's hear it for the Girls!!

Happy Friday, everyone!! As you are reading this, I am enjoyinga long weekend in South Carolina! I have a speaking engagement in Rock Hill tomorrow, then I'll spend a couple of days with my mom. Should be fun! But before heading out, I had fun with this week's Friday Mashup, brought to us by Kasey! Ready? Here it is:


  1. Make a project featuring a Girly Theme

  2. Make a project using Your Favorite Technique

  3. Or Mash it Up...and make a project with a Girly theme, using your favorite technique.


Well, because I hosted a big party this past weekend, and I am traveling this weekend, I had to think FAST! And so I decided to Mash it Up with one of my favorite techniques from my earliest stamping days: Making my own Designer Paper!! I was inspired by my Stampin' Up designer paper, Flirtatious (girly title!), which was out on my table already since my nieces (young girls) were using it Sunday. But I wanted different colors, so I decided to make my own. I started with a wisteria wonder card base, then stamped randomly on whisper white with my Delicate Doilies (very girly!!) stamp set. I used wisteria wonder, lucky limeade, pool party, and concord crush classic inks. I embellished with concord twill ribbon and basic jewel rhinestones. My sentiment is from On Your Birthday, stamped in concord, with some limeade doilies...punched out with my scallop circle and layered overe an extra large scallop circle in pool party. Of course, the smaller circle is popped up with dimensionals.


I love lots of techniques...but embossing and watercoloring takes a bit more time. Don't be afraid to pull out some basics when you need a quick card. You could crank out a lot of these in no time!


...That is, if you don't have to pack your bags for a road trip! Be sure to check out the Friday Mashup blog for inspiration from the design team, and use keyword FM32 in your online gallery. Can't wait to see what you create!!


Inky {{{HUGS}}}

Saturday, November 5, 2011

Well Worn Birthday


Hello again! As I mentioned earlier, we are hosting a birthday party for my mother-in-law, but one of my nephews also has a birthday coming up. He is in his early 20's. I don't know about you, but guy cards are tough for me, especially young adult cards.

Well Worn designer series paper from Stampin' Up to the rescue! I simply placed this pattern which has a fleur du lis pattern on my basic black card base. I added extra large silver brads at the corners. The sentiment is from Delightful Dozen, stamped in not quite navy ink on very vanilla card stock. I also lightly sponged with river rock and basic gray and layered it on river rock card stock. The final detail is tearing the edges and sponging with more basic gray ink.


Hope he likes it! The DQ gift card inside should help the cause!


Inky {{{HUGS}}}

Happy Birthday with a Double Challenge!


Tomorrow, I am hosting a birthday party for my mother-in-law, so of course, I needed a card. I combined this week's color challenge on splitcoaststampers (it's been ages since I have participated!) with this week's Paper Players blog challenge...due in 20 minutes!! Aaaack!! It is due on Fridays at midnight...but Pacific time. So yes, it is nearly 2 a.m. in my home. I should be in bed! LOL!!

The Paper Player's Challenge is Anything Goes, with a Fall theme. Well, the color challenge is a fabulous fall palatte...more mustard, always artichoke, and bravo burgundy. Easy to combine these challenges!!


All of the productgs used are from Stampin' Up except those 2 little gold beads. I have had them for years...just wanted some shine, and it was too late to add brads. (Yes, the leaves
were already attached!)
I started with an always artichoke card base, and added a layer of very vanilla which was embossed with the big shot and square lattice impressions folder, then sponged with mustard and burgundy inks. I stamped the sentiment from On Your Birthday in burgundy on vanilla card stock, tore the edges a bit, then sponged with artichoke ink. I layered it with some spice cake dsp and burgundy card stock. I used sizzix leaves die and the big shot, then embossed the leaves also with the square lattice folder. Some dimensionals make this a plump card...but it will be hand delivered! One more thing...I added 1/4" grosgrain ribbon in the challenge colors.

Now...gotta get some sleep. I have a lot of house cleaning to do before the party!!

Inky {{{HUGS}}}

Friday, November 4, 2011

Friday Mashup!! Grateful to be On Time!

Hello Stamping Friends!! I cannot believe it is Friday already! Time for another Friday Mashup challenge! After being late with my project last week, I am thrilled to get back on track! I started feeling funky Wednesday afternoon, and was home sick yesterday. That makes my week disappear! I'll be playing catch-up at work today! But first, here's a fun challenge from Lisa!!


  1. Make a project using heat embossing

  2. Or make a Thank You (Grateful) project

  3. Or Mash It Up and make a Thank You project using heat embossing


Now, I love heat embossing, but I don't do it often enough. This gave me a great excuse to plug in my embossing tool! All products are current and from Stampin' Up! I started with a soft suede card base. I added some Spice Cake dsp (in the Holiday Mini), including a bit on the inside. I stamped this wonderful image from "Always Thankful" (also in the mini) with soft suede craft ink on very vanilla card stock, coated in clear embossing powder, then heat embossed. The craft ink is available in little "spots" by color collection. I love them for dabbing ink all over an image. After heating, I colored the image with my blender pens, using pear pizazz, river rock, pumpkin pie, more mustard, and basic gray inks. I sponged the background with pear pizazz and pool party. I then mounted it on pumpkin pie and pear pizazz card stock, and adhered with dimensionals. I added pear pizazz poly twill ribbon and the sentiment is from the same stamp set, also heat embossed. After punching it out with the scallop oval, I lightly sponged with pool party.


Thank you cards are always needed...whether for my ministry work or for my numerous friends who are blessings in my life! I hope you join us in this challenge and make a fun Thank You project for someone special in your life! Be sure to checkout the inspiration pieces on the Friday Mashup blog from the Design Team, including our new November Guest Designers!! Then link up your project, and use keyword FM31 in your online gallery. Can't wait to see your project!


Inky {{{HUGS}}}